Redux Toolkit (RTK) 簡化狀態管理

在 Redux Toolkit 出現前,使用 Redux 頻繁操作 state 是一件相對麻煩的事情,而 Redux Toolkit 的出現簡化了重複性流程,也提供了一些 API 減少重複性質的程式碼。
Redux Toolkit
Redux Toolkit 目的是為了簡化 Redux 開發流程
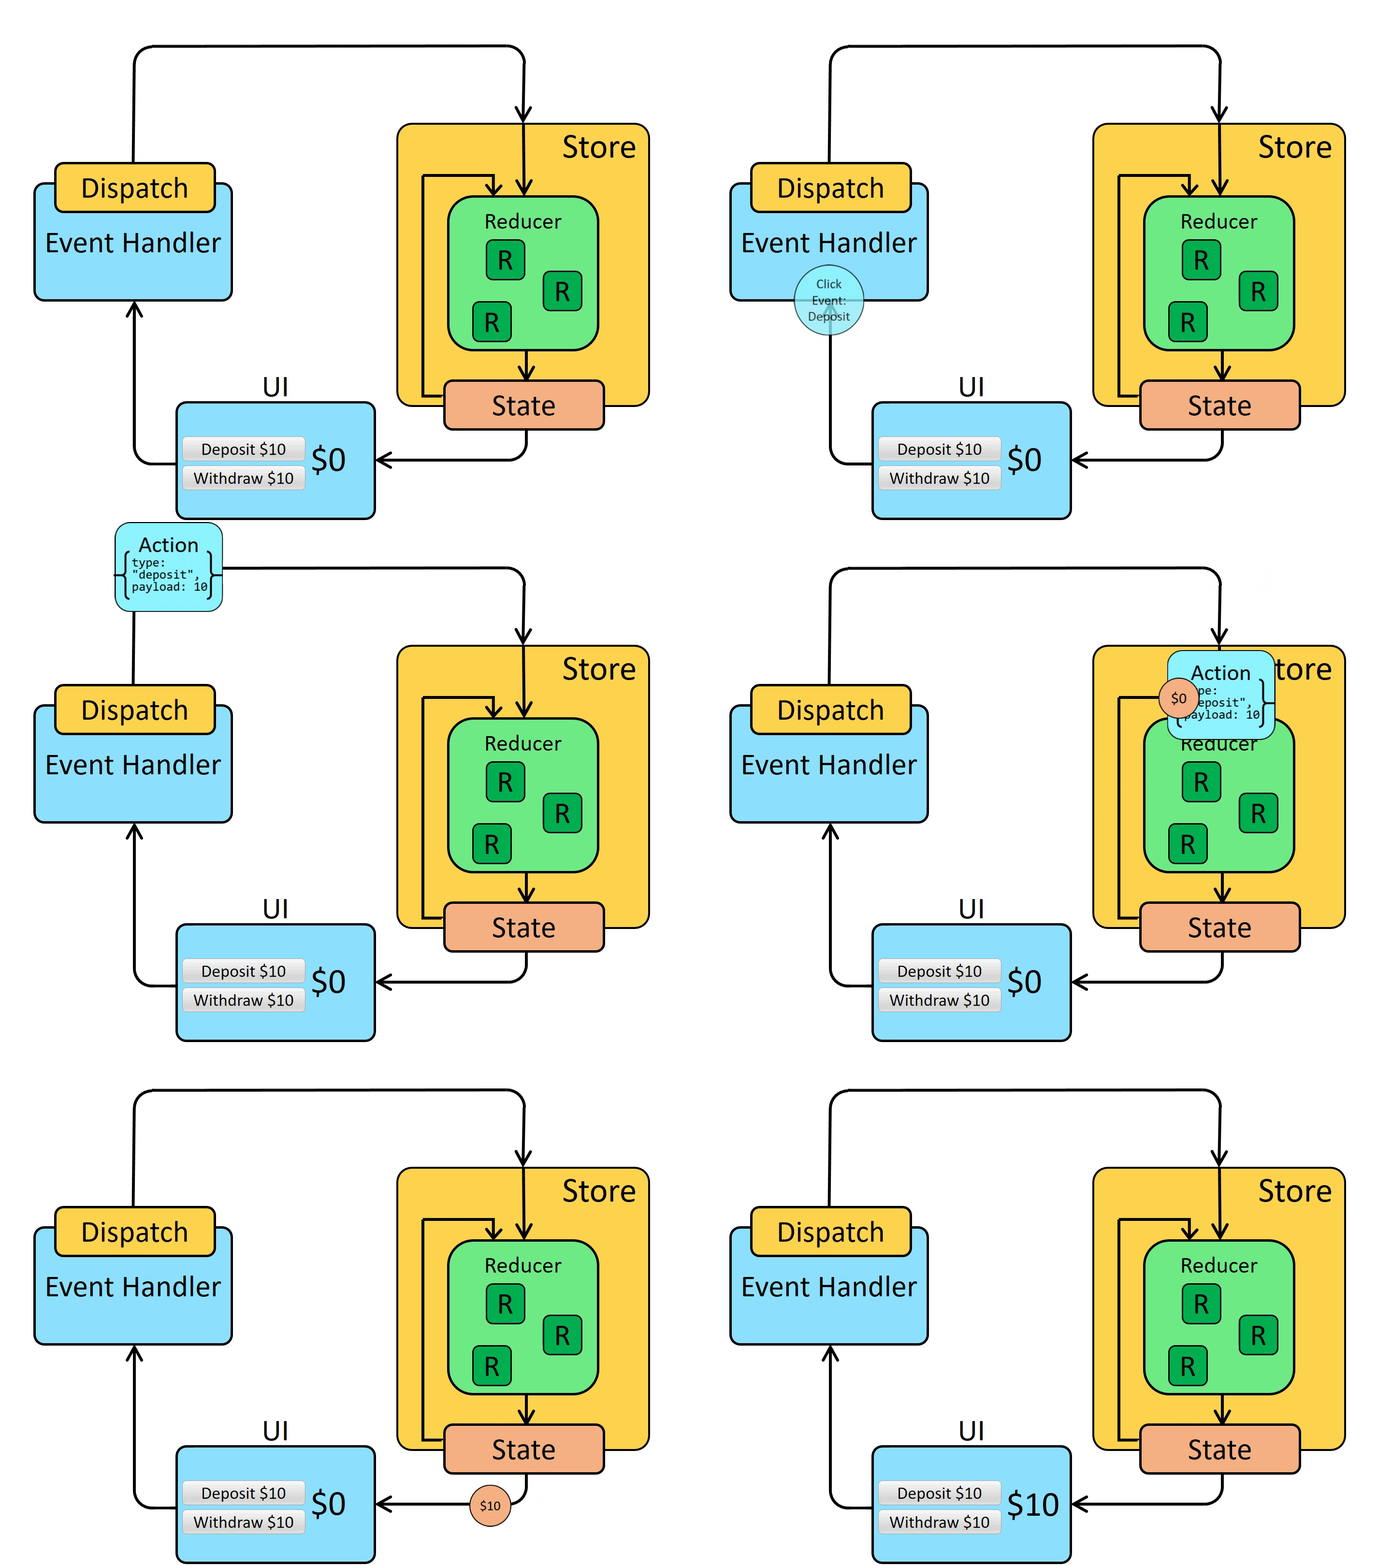
首先,我們可以先參考傳統的 Redux 資料流作法:

簡單的說,在傳統的 Redux 中,我們會有一個 Store 用來保存 state,並透過元件上的 dispatch 觸發 action 來更新 state。
在 Redux 的早期版本中,每個 action 都需要手動創建 action type 和 action creator。
過程不僅繁瑣,而且在撰寫 reducers 時,我們需要使用 switch 語句來處理不同的 action type,並且還需手動確保 state 的不可變性(immutability)。 這些流程都增加了開發和維護的複雜度,尤其是在處理大規模應用時。
而在 Redux Toolkit 中引入了一個概念,就是 Slice。
Slice 是指 reducer 和 actions 的集合體,每個 slice 包含一組 reducer 和 actions,可以用來處理某個特定的 state 區塊。
Slice 的優勢就是每一個 slice 專注於處理特定的 state 區塊和相關邏輯,可以讓程式更加模組化和可維護。
另外 Redux Toolkit 也提供了許多 API(如 createSlice 和 configureStore)來減少重複性質的程式碼。
且 Redux Toolkit 還使用了 Immer 套件來幫我們自動處理許多繁瑣的細節,包括 state 的不可變性(immutability)和 action 的生成,讓開發過程能更有效率且直觀。
快速開始
使用 Redux Toolkit 之前需要先安裝
建議可以參考 官方文件 操作,文件中也有提供一些程式碼參考
首先安裝 Redux Toolkit 和 React-Redux
npm install @reduxjs/toolkit react-redux建立 Store
這裡可以使用 Redux Toolkit 提供的 API configureStore(),和 Redux 的 createStore() 一樣
範例:
import { configureStore } from "@reduxjs/toolkit";
export const store = configureStore({ reducer : { // 用來註冊 reducer },})掛載到 App
到 index.js 使用 Provider 將 store 提供給全域使用
範例:
import React from 'react'import ReactDOM from 'react-dom'import { Provider } from 'react-redux'import App from './App'import store from './app/store'
ReactDOM.render( <Provider store={store}> <App /> </Provider>, document.getElementById('root'))建立 Slice
可以使用 createSlice 建立一個 slice,它會幫你自動生成 actions 和 reducer。
可以再依照自己需求調整 actions 和 reducer。
範例:
import { createSlice } from '@reduxjs/toolkit'
const initialState = { value: 0 }
const counterSlice = createSlice({ name: 'counter', initialState, reducers: { // actions increment(state) { state.value++ }, decrement(state) { state.value-- }, incrementByAmount(state, action) { state.value += action.payload }, },})
export const { increment, decrement, incrementByAmount } = counterSlice.actionsexport default counterSlice.reducer建立 Action
當然你也可以將 action 拆出來獨立定義,不過這個模式比較適用在複雜的情境,可能需要定義多個 action types 或處理一些特殊的 action。
createSlice 和 createAction:
-
createSlice提供了更高級的 API,適合大多數應用場景,因為它同時處理 actions 和 reducers,簡化了 Redux 的使用。 -
createAction是一個更底層的工具,用於創建獨立 actions。
範例:
import { createAction } from '@reduxjs/toolkit'
// 定義 actionsconst increment = createAction('counter/increment')const decrement = createAction('counter/decrement')
// 使用 actionsconsole.log(increment()) // { type: 'counter/increment' }console.log(decrement()) // { type: 'counter/decrement' }註冊 reducer
這時候就到剛剛的 store 註冊剛剛在 slice 撰寫的 reducer
範例:
import { configureStore } from '@reduxjs/toolkit'import counterReducer from '../features/counter/counterSlice'
const store = configureStore({ reducer: { counter: counterReducer, },})
export default store如何改變 state 以及取得 state
現在就可以開始在元件中去使用了
可以使用 Redux 提供的 useSelector 和 useDispatch 去將 state 取出,並透過 dispatch 觸發 action 來改變 state
範例:
import React from 'react'// redux hooksimport { useSelector, useDispatch } from 'react-redux'// slice actionsimport { increment, decrement, incrementByAmount } from './features/counter/counterSlice'
function App() { // 透過 useSelector 取出 state const count = useSelector((state) => state.counter.value) // 創建 dispatch const dispatch = useDispatch()
return ( <div> <h1>{count}</h1> <button onClick={() => dispatch(increment())}>Increment</button> <button onClick={() => dispatch(decrement())}>Decrement</button> <button onClick={() => dispatch(incrementByAmount(5))}>Increment by 5</button> </div> )}
export default AppcreateAsyncThunk 非同步處理
createAsyncThunk 是 Redux Toolkit 提供的工具,用於處理非同步操作,像是 API request 等等。
createAsyncThunk 用於生成一個 thunk action creator,這個 action creator 可以處理非同步操作,並自動生成三個 action types:
-
Pending:當非同步操作正在進行時觸發。
-
Fulfilled:當非同步操作成功完成時觸發。
-
Rejected:當非同步操作失敗時觸發。
這樣你可以在 reducers 中輕鬆處理這些狀態的變化。
範例:
import { createSlice, createAsyncThunk } from '@reduxjs/toolkit'
// 定義非同步 thunkexport const fetchCount = createAsyncThunk( 'counter/fetchCount', async (amount) => { const response = await fetch(`/api/counter?amount=${amount}`) const data = await response.json() return data })// 建立 slice,actions 和 reducer 的集合const counterSlice = createSlice({ name: 'counter', initialState: { value: 0, status: 'idle', // 'idle' | 'loading' | 'succeeded' | 'failed' error: null, }, reducers: { // actions increment(state) { state.value++ }, decrement(state) { state.value-- }, }, extraReducers: (builder) => { // 使用 extraReducers 來處理非同步 thunk 的 lifecycle actions builder .addCase(fetchCount.pending, (state) => { // 當請求開始時 state.status = 'loading' }) .addCase(fetchCount.fulfilled, (state, action) => { // 當請求成功時 state.status = 'succeeded' state.value += action.payload }) .addCase(fetchCount.rejected, (state, action) => { // 當請求失敗時 state.status = 'failed' state.error = action.error.message }) },})
export const { increment, decrement } = counterSlice.actionsexport default counterSlice.reducer#補充:為什麼使用 Thunk?
- Thunk 允許你在 actions 中寫入異步邏輯,比如 API 請求、定時器等。
- 你可以在非同步操作完成後再 dispatch actions,這樣能夠控制何時更新 Redux store。
- Thunk 允許你在 action 中進行複雜的邏輯處理,例如連續 dispatch 多個 actions。
參考來源
Licensed under CC BY-SA 4.0
Unless otherwise noted, content on this site is licensed under CC BY-SA 4.0. You are free to share and adapt with attribution.
